Import, Export, and Mass Update WordPress Content Using CSVs

As user-friendly as WordPress is, sometimes you just need your website content in a spreadsheet.
Maybe you’re looking to make mass updates.
Perhaps you’re migrating content from one website to another, or from a different platform to WordPress.
Or, maybe you just need to take stock and audit all of the pages, posts, custom post types, custom fields, users, and more that currently sit in your website’s database.
It seems like it should be easy to import and export your content using a CSV file – and it is, but only if you have the right tools.
How to Export Your WordPress Content as a Spreadsheet
The standard WordPress database stores all of your posts, pages, and custom post types in one table, called wp_posts.
That table includes fields for:
- ID
- Author
- Title
- Content
- URL
- Status
- Type
But the database also stores some post content in a second table, called wp_postmeta. This is where all of your content’s custom fields get stored – and, assuming you’re not just running a blog, much of your content will store at least some values in custom fields.
If you’re handy with databases, you can always do a database dump to grab all of the content from one or both of these tables… but you’re not getting it in the most user-friendly format. That’s because the database structure is meant for your WordPress installation, and not you, an actual person.
So, what do you do if you want to export your content in a human-readable spreadsheet or XML file?
We recommend the WP All Import plugin suite, which includes options for exporting and importing WordPress content, including all of your post types, users, and more.
Technically, it’s two plugins — one for importing, and one for exporting — with a number of add-ons for increased functionality.
The add-ons include the ability to import and export the following:
- Fields created by Advanced Custom Fields
- WooCommerce product and order fields
- Users and all of their data
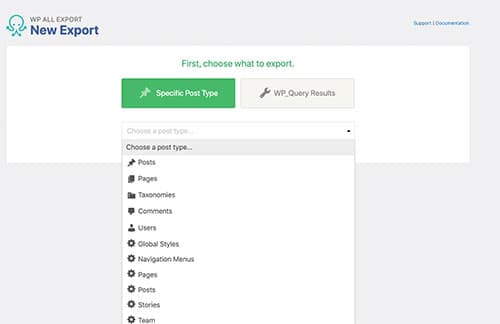
Exporting your content is relatively straight-forward; after you install the WP All Export plugin, choose a New Export, select your content type, and then drag-and-drop the specific fields you want exported as columns in your spreadsheet.
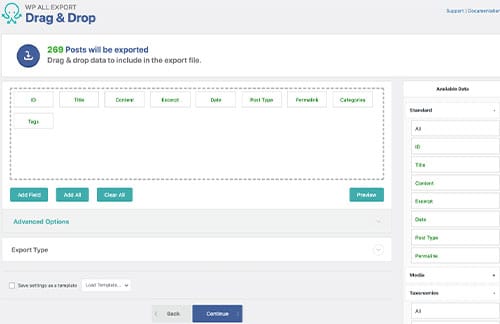
After you’ve set everything up, export and download your file!
You also have the ability to save this export as a template (so you don’t need to set it up again and again) and even to schedule it to happen on a regular basis.
Importing and Mapping Your Content to WordPress
Importing content from another WordPress site or from a different platform has a few more steps, but is still relatively easy to do.
When you have the WP All Import plugin installed, select “New Import” and choose whether to upload a file (saved as CSV or XML), download a file from a URL or via FTP, or to use an already uploaded file.
If you’re creating a new CSV, set it up like you would any other spreadsheet. Use a header row to name each column, and then put the data in the subsequent rows.
Here’s where you want to make sure you follow the instructions precisely:
- You’ll be given the option to create NEW content, or to update existing content, and what type of content it is. Choose wisely!
- On Step 2, you’ll get a preview of your file’s content — presumably a header row that explains what each field contains, and then the data from the first row.
- On Step 3, drag-and-drop the elements from your spreadsheet using the content preview on the right-hand sidebar. Make sure that all of the fields you want to insert or update have an element in them; each one should look something like this: {COLUMNTITLE[1]}
- If you’re adding images, custom fields, or choosing categories, make sure those get mapped here as well. If all of your imported content has the same category or some other field, you can always type in the value in the field mapper.
- If you’re updating existing content on your site, you do NOT need to map every field – you only need to map the field you are updating and one other field (usually title or ID) to compare against.
- On Step 4, you’ll need to set a unique identifier so that future imports are correctly linked with the records being created or updated, as well as choose exactly what should happen if existing records are found.
That’s a lot of steps, but thankfully there’s a walkthrough video here that should help:
What’s great about this plugin is that, even if your data is complicated – like with ACF Repeater Rows, Parent/Child Taxonomies, WooCommerce variations – it can all be imported correctly.
It’s a WordPress plugin built by folks who understand WordPress and are making it simple for you to manage your data in a user-friendly way.
The WP All Import plugin suite is just one of the many premium plugins available for free to Digital Ink’s Website Management clients. Interested in finding out more? Contact us now.