Limiting Product Availability by Date in WooCommerce

If you’re using WooCommerce to sell products online, you already know that it’s an incredibly extensible platform.
From the library of WooCommerce extensions and plugins to the highly customizable emails and notifications, you can make WooCommerce do pretty much anything you need it do.
One common request we receive is to make certain products available only on certain dates, or only for certain periods of time.
It’s a relatively straight-forward feature, but things can get complicated the more products you offer and when exactly each is available.
Setting Availability Dates by Product or Category
Every store manages their inventory and its availability slightly differently, but what we normally see is either:
- specific products available for limited release dates
- a category of products only available at certain times
How you can approach implementing the availability dates varies, but we prefer using Advanced Custom Fields (ACF) and the Date Picker field to set a First Available Date and a Last Available Date.
While the “Display Format” you choose for the date can be customized, the “Return Format” should use the Ymd format. You’ll see why in a minute.
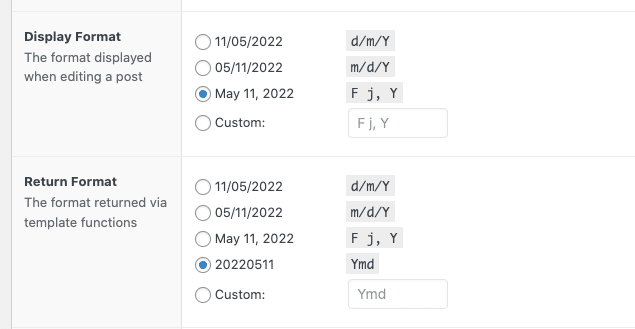
Your two new custom fields (First Available Date and Last Available Date) should be accessible on specific products (if you’re going that route) or on the product categories (if that’s how you’re organizing them). Again, make sure that the “Return Format” is set to Ymd.
Reviewing the WooCommerce Cart and Determining Availability
This is where the magic happens.
If you only have one product in your cart with limited dates, it’s not that difficult to figure out its availability.
- What’s the first day it’s available?
- What’s the last day it’s available?
- Pass that information into your jQuery datepicker.
But when you have multiple products in your cart, either all with limited availability or some with and some without – that’s where you need some solid logic.
You can approach this by looping through your cart products, reviewing all of the availability dates, and finding the dates that all the products in the cart are available to be ordered.
For the sake of simplicity, I’m going to show code where the availability dates are stored in the individual products – not in the category in which they reside.
The basic function looks like this …
add_action('woocommerce_review_order_before_order_total', 'availability_window');

function availability_window(){
     global $woocommerce //Let's tap into the global Woo variable
     $firstavailable = array(); //This array will collect all of our First Available Dates
     $lastavailable = array(); //This array will collect all of our Last Available Dates

     //Let's loop through the cart and grab those dates
     foreach ( $woocommerce->cart->get_cart() as $cart_item_key => $values ) {
          $_product = $values['data'];
          if ( get_field('first_available_date',$_product->id) ) {
               $date = get_field('first_available_date',$_product->id);
               $firstavailable[] = $date;
          }
          if ( get_field('last_available_date',$_product->id) ) {
               $date = get_field('last_available_date',$_product->id);
               $lastavailable[] = $date;
          }
     }
    /*We've got all of our first available dates and our last available dates, now we need to find the LATEST first available date and the EARLIEST last available date, and format it for the jQuery datepicker*/
     if (!empty($firstavailable)) {
          $largest= max($firstavailable);
          $earliestdate = DateTime::createFromFormat('Ymd', $largest);
          $earliestdate = $earliestdate->format('F j, Y');
     }
     if (!empty($lastavailable)) {
          $smallest= min($lastavailable);
          $latestdate = DateTime::createFromFormat('Ymd', $smallest);
          $latestdate = $latestdate->format('F j, Y');
     }
}
At this point, you should have:
- the first available date that ALL of the products in the cart are available
- the last available date that ALL of the products in the cart are available
Now, depending on how much you limit your products – this could be a very short window, or no window at all.
If the earliest date is AFTER the latest date, you need to display an error message to your user so they know exactly why they can’t order. Preferably, give them a direct link to edit their cart and the ability to easily see when each product is actually available.
Assuming that they do have a working availability window, you simply need to convert these dates to JavaScript date objects, and set them as the “minDate” and “maxDate” in your jQuery datepicker.
<script type="text/javascript">
var min = new Date("<?php echo $earliestdate;?>");
var max = new Date("<?php echo $latestdate;?>");
jQuery(function($) {
     $('#datepicker').datepicker({
          minDate: min,
          maxDate: max,
     });
     $("#datepicker").attr( 'readOnly' , 'true' );
});
</script>
And there you have it. Logic that will look at all the products in your customer’s WooCommerce cart, figure out when they are all available, and limit the dates they can be selected accordingly.
Have any WooCommerce questions? Reach out and we’ll do our best to help.

