Add an Alert Bar for Easy, Sitewide Notifications
Every so often, you just have to tell your website visitors something important. We’ve all been there.
Perhaps:
- A really important deadline is coming up that they need to know about
- Something big is happening or something’s broken and it’s affecting what you do
- There’s some news or controversy you’ve responded to, and want to make sure everyone knows about it
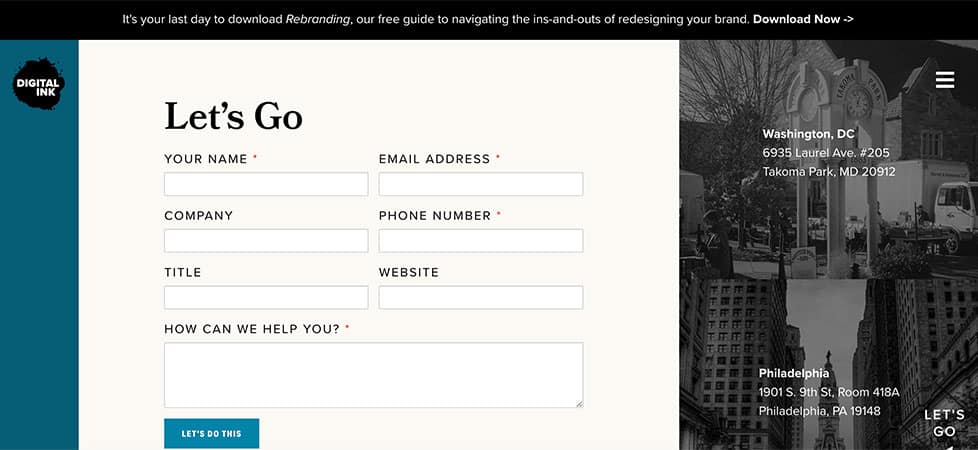
These are all examples of real-life situations we’ve had with our partners, and every time we’ve been asked to build an alert bar to notify website visitors about it. These notification bars can be seen on every single page of the website, right at the top, above even the logo and menu.
In other words, it’s impossible to miss.
When we build these alert bars, we intend for them to be easily accessible so that, should they need to be turned on or off quickly, any stakeholder who has access to WordPress can make it.
Is your business or organization closed today because of the weather?
Are your phone systems down and the website is the best way to contact you?
Is the deadline to order your products in time for Christmas coming up?
Then you need an alert bar.
Build a WordPress Alert Bar Using Advanced Custom Fields
Integrating an alert bar into your WordPress site can be done a number of ways. There’s more than one plugin that does the job, and they’re usually packed with features (whether or not you actually need them).
Per our web development philosophy of not overbuilding and not adding more plugins than absolutely necessary, we’d rather roll our own solution.
The good news is that, with Advanced Custom Fields, it’s incredibly easy to build an alert bar that you can edit and turn on and off with a click.
Here’s how you do it.
First, you need to create the custom fields for your Alert Bar. You can do this with 3 – or even 2 – fields.
- A select dropdown called “Activate Alert Bar” with two options: No and Yes
- A WYISWYG field called “Alert Bar Text” where the actual notification message goes
- A color picker field called “Background Color” that gives you the ability to choose the alert’s background color (optional)
I’ve provided these fields in this JSON file; feel free to import them into your ACF as is (Custom Fields -> Tools -> Import). Right now, they are set to display on an ACF options page called “Alert Bar”; either create that Options page or adjust accordingly so they display for you.
Second, you need to add the HTML to your header.php file to display the Alert Bar when it’s activated.
Our HTML is built using the Bootstrap framework; adjust for your project or add the CSS styles you need to make sure this is a full-width bar with just enough padding.
<?php if(get_field('activate_alert_bar','options') == 'yes'){?>
     <div class="alert-bar p-3"<?php if(get_field('alert_background_color','options')){?> style="background-color:<?php the_field('alert_background_color','options');?>"<?php }?>>
          <div class="container">
               <div class="row">
                    <div class="col-12"><?php the_field('alert_bar_text','options');?></div>
               </div>
          </div>
     </div>
<?php }?>
That’s it.
You’ve got an alert bar you can easily manage, update as necessary and, most importantly, keep your customers in the loop.
Have WordPress or web development question you need help with? Reach out and we’ll do our best to respond.